 en
en Biomes and Decorations
Introduction
The ability to register biomes and decorations is vital when aiming to create an interesting and varied in-game environment. This chapter teaches you how to register biomes, how to control biome distribution, and how to place decorations in biomes.
- What are Biomes?
- Biome Placement
- Registering a Biome
- What are Decorations?
- Registering a Simple Decoration
- Registering a Schematic Decoration
- Mapgen Aliases
What are Biomes?
A Minetest biome is a specific in-game environment. When registering biomes, you can determine the types of nodes that appear in them during map generation. Some of the most common types of node that may vary between biomes include:
- Top node: This is the node most commonly found on the surface. A well-known example would be “Dirt with Grass” from Minetest Game.
- Filler node: This is the layer immediately beneath the top node. In biomes with grass, it will often be dirt.
- Stone node: This is the node you most commonly see underground.
- Water node: This is usually a liquid and will be the node that appears where you would expect bodies of water.
Other types of node can also vary between biomes, providing an opportunity to create vastly different environments within the same game.
Biome Placement
Heat and Humidity
It is not enough to simply register a biome; you must also decide where it can occur in game. This is done by assigning a heat and a humidity value to each biome.
You should think carefully about these values; they determine which biomes can be neighbours to each other. Poor decisions could result in what is meant to be a hot desert sharing a border with a glacier, and other improbable combinations which you may prefer to avoid.
In game, heat and humidity values at any point of the map will usually be between 0 and 100. The values gradually change, increasing or decreasing as you move around the map. The biome at any given point will be determined by which of the registered biomes has heat and humidity values closest to those at that position on the map.
Because the changes in heat and humidity are gradual, it is good practice to assign heat and humidity values to biomes based on reasonable expectations about that biome’s environment. For example:
- A desert might have high heat and low humidity.
- A snowy forest might have low heat and a medium humidity value.
- A swamp biome would generally have high humidity. * In practice, this means that, as long as you have a diverse range of biomes, you are likely to find that the biomes which border each other form a logical progression.
Visualising Boundaries using Voronoi Diagrams
Fine-tuning heat and humidity values for biomes is easier if you can visualise the relationship between the biomes you are using. This is most important if you are creating a full set of your own biomes, but can also be helpful if you are adding a biome to an existing set.
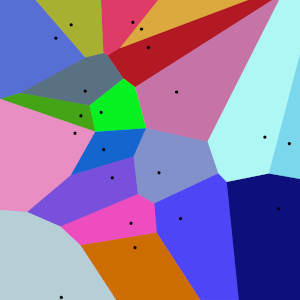
The simplest way to visualise which biomes may share borders is to create a Voronoi diagram, which can be used to show which point on a 2-dimensional diagram any given position is closest to.
A Voronoi diagram can reveal where biomes that should border each other do not, and where biomes that should not border each other do. It can also give a general insight into how common biomes will be in-game, with larger and more central biomes being more common than smaller biomes or biomes that are located on the outer edge of the diagram.
This is done by marking a point for each biome based on heat and humidity values, where the x-axis is heat and the y-axis is humidity. The diagram is then divided into areas, such that every position in a given area is closer to the point inside that area than it is to any other point on the diagram.
Each area represents a biome. If two areas share a border, the biomes they represent in-game can be located next to each other. The length of the border shared between two areas, compared to the length shared with other areas, will tell you how frequently two biomes are likely to be found next to each other.
Creating a Voronoi Diagram using Geogebra
As well as drawing them by hand, you can also create Voronoi diagrams using programs such as Geogebra.
-
Create points by selecting the point tool in the toolbar (icon is a point with ‘A’), and then clicking the chart. You can drag points around or explicitly set their position in the left sidebar. You should also give each point a label, to make things clearer.
-
Next, create the voronoi by entering the following function into the input box in the left sidebar:
Voronoi({ A, B, C, D, E })Where the each point is inside the curly brackets, separated by commas. You should now
-
Profit! You should now have a voronoi diagram with all draggable points.
Registering a Biome
The following code registers a simple biome named grasslands biome:
minetest.register_biome({
    name = "grasslands",
    node_top = "default:dirt_with_grass",
    depth_top = 1,
    node_filler = "default:dirt",
    depth_filler = 3,
    y_max = 1000,
    y_min = -3,
    heat_point = 50,
    humidity_point = 50,
})
This biome has one layer of Dirt with Grass nodes on the surface, and three layers of Dirt nodes beneath this. It does not specify a stone node, so the node defined in the mapgen alias registration for mapgen_stone will be present underneath the dirt.
There are many options when registering a biome, and these are documented in the Minetest Lua API Reference, as always.
You don’t need to define every option for every biome you create, but in some cases failure to define either a specific option, or a suitable mapgen alias, can result in map generation errors.
What are Decorations?
Decorations are either nodes or schematics that can be placed on the map at mapgen. Some common examples include flowers, bushes, and trees. Other more creative uses may include hanging icicles or stalagmites in caves, underground crystal formations, or even the placement of small buildings.
Decorations can be restricted to specific biomes, by height, or by which nodes they can be placed on. They are often used to develop the environment of a biome by ensuring it has specific plants, trees or other features.
Registering a Simple Decoration
Simple decorations are used to place single node decorations on the map during map generation. You must specify the node that is to be placed as a decoration, details for where it can be placed, and how frequently it occurs.
For example:
minetest.register_decoration({
    deco_type = "simple",
    place_on = {"base:dirt_with_grass"},
    sidelen = 16,
    fill_ratio = 0.1,
    biomes = {"grassy_plains"},
    y_max = 200,
    y_min = 1,
    decoration = "plants:grass",
})
In this example, the node named plants:grass will be placed in the biome named grassy_plains on top of base:dirt_with_grass nodes, between the heights of y = 1 and y = 200.
The fill_ratio value determines how frequently the decoration appears, with higher values up to 1 resulting in a great number of decorations being placed. It is possible to instead use noise parameters to determine placement.
Registering a Schematic Decoration
Schematic decorations are very similar to simple decoration, but involve the placement of a schematic instead of the placement of a single node. For example:
minetest.register_decoration({
    deco_type = "schematic",
    place_on = {"base:desert_sand"},
    sidelen = 16,
    fill_ratio = 0.0001,
    biomes = {"desert"},
    y_max = 200,
    y_min = 1,
    schematic = minetest.get_modpath("plants") .. "/schematics/cactus.mts",
    flags = "place_center_x, place_center_z",
    rotation = "random",
})
In this example the cactus.mts schematic is placed in desert biomes. You need to provide a path to a schematic, which in this case is stored in a dedicated schematic directory within the mod.
This example also sets flags to center the placement of the schematic, and the rotation is set to random. The random rotation of schematics when they are placed as decorations helps introduce more variation when asymmetrical schematics are used.
Mapgen Aliases
Existing games should already include suitable mapgen aliases, so you only need to consider registering mapgen aliases of your own if you are making your own game.
Mapgen aliases provide information to the core mapgen, and can be registered in the form:
minetest.register_alias("mapgen_stone", "base:smoke_stone")
At a minimum you should register:
- mapgen_stone
- mapgen_water_source
- mapgen_river_water_source
If you are not defining cave liquid nodes for all biomes, you should also register:
- mapgen_lava_source